

A new attendance report for Teams meetings
In today’s post we’re going to cover how to take attendance—well, find out who attended, at least—in a meeting in Microsoft Teams. For a video overview of this topic—including screenshots and demos—press play below.
Background
If you run meetings in Microsoft Teams, you’re able to track who has attended those meetings, what time they joined, what time they left, what time they re-joined, etc. This works for internal and external attendees.
Only the meeting organizer can download the attendance report and these reports are only available if your admin has enabled the feature. There are two ways to get the report: during the meeting and after. Being able to get the report after the meeting is new as of October 2020 and should roll out to every organization by the end of the month, however—and that’s a big however—your Office 365 admin has to enable the new feature by running a PowerShell command. If you’re not in charge of this or you don’t know what that means and you want the new feature, reach out to your admin and ask them to enable it. The PowerShell cmdlet is below:
Set-CsTeamsMeetingPolicy -Identity Global - AllowEngagementReport "Enabled"
Unfortunately the Microsoft 365 roadmap still says this feature's coming out in September, by the way (as of publishing this post). Administrators recently received news that it’s delayed to the end of October. Just so there's no confusion in that regard.
There are a couple big benefits to the change. First, you’re no longer running into the issue of being out of luck on attendance if you forgot to download it during the meeting. You can get it after any time you want. Second, the new report contains more information.
And as far as I know, there’s no way for someone to fudge this information. For them to show up on the attendance list, they have to click that join button and be present, at least at that moment. What they do during the meeting, of course, is a different story. But you’ll know if people are late to a meeting or class or skipping out early.
Get the report after the meeting
Since most people will likely want to get the attendance report after the meeting, let’s cover that first. And there’s not much to cover. It’s simple. Once the meeting concludes—meaning everyone has left—the attendance report will automatically show up in the meeting chat, visible only to the meeting organizer. That means nobody else sees this particular box other than the organizer. If you’ve recorded the meeting or enabled live captions, the attendance report will be grouped with the recording and transcript.
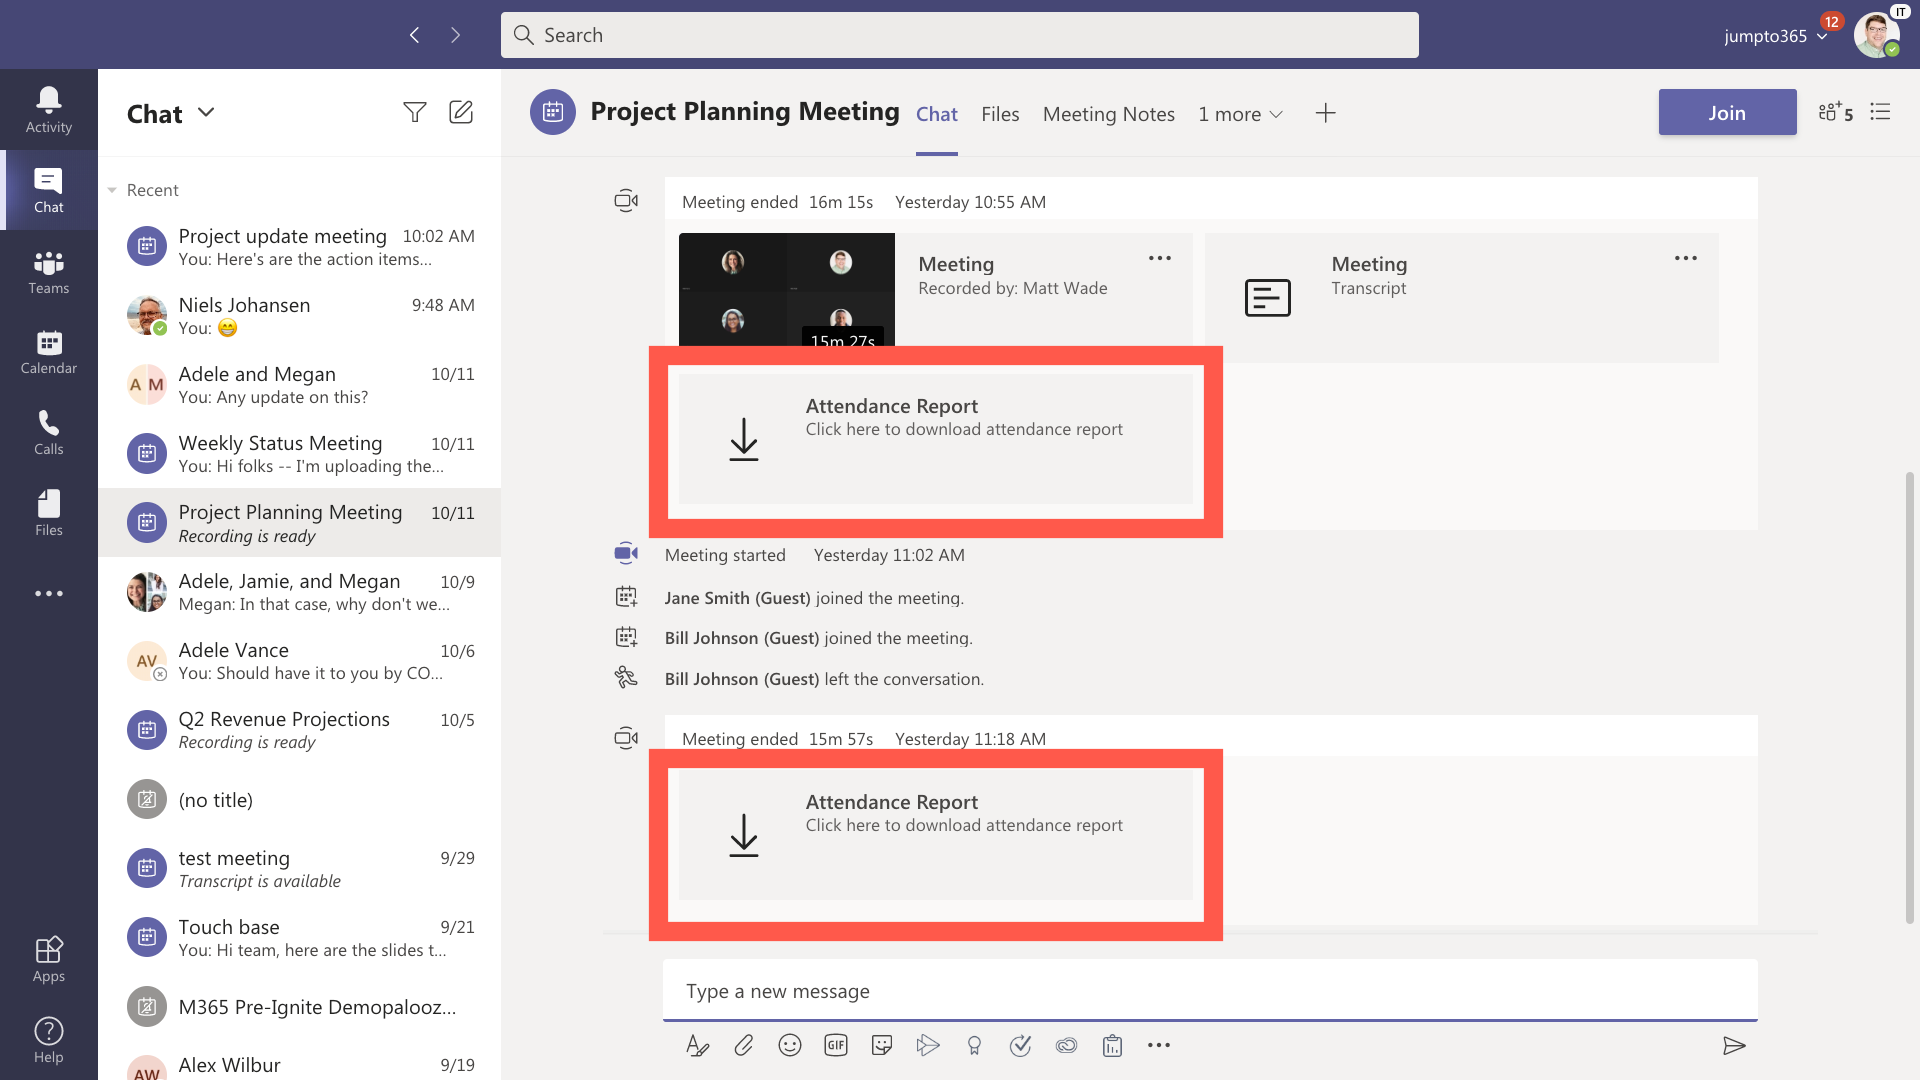
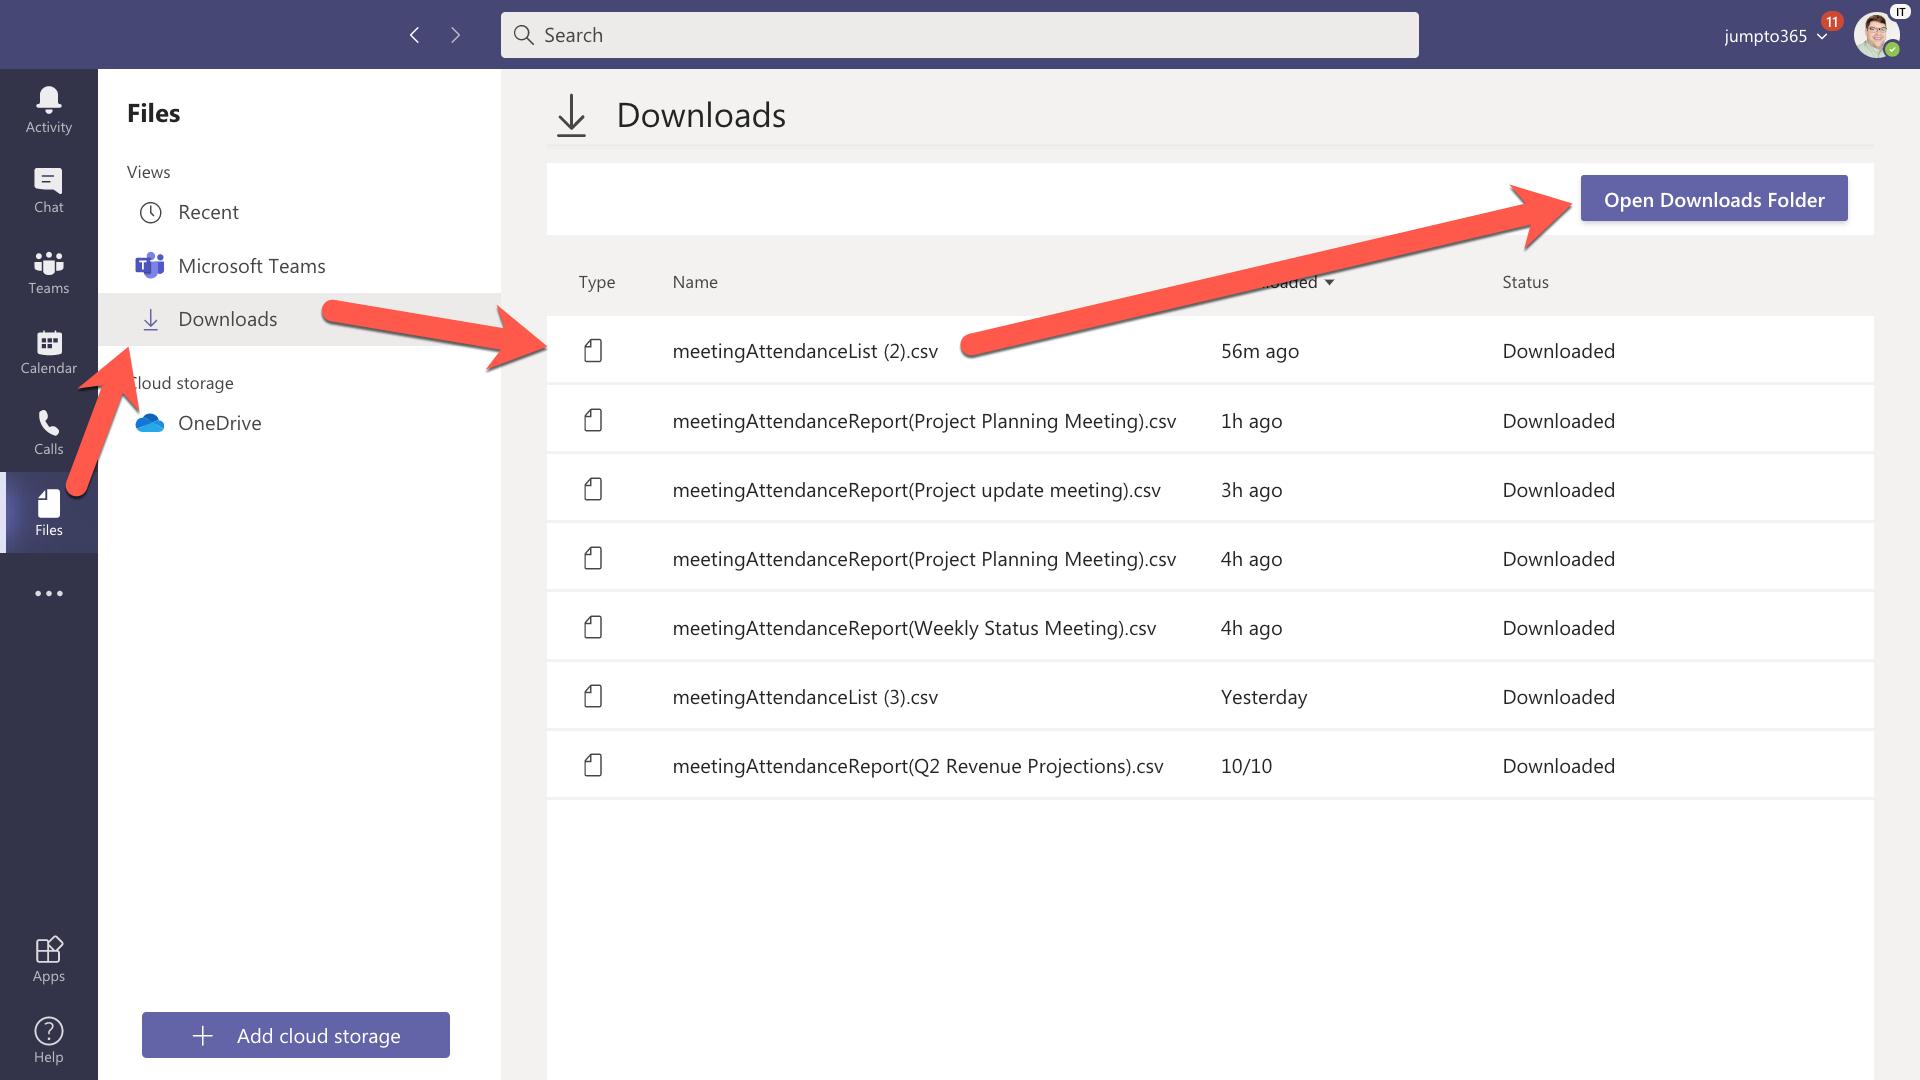
Based on some testing, this definitely isn’t immediate. It shows up anywhere from 20 minutes to an hour after the meeting ends. So plan accordingly. And from here you can download the file. It will download to your computer’s designated downloads folder. You can also find the file in the Files app in Teams via the Downloads folder.
Quick tip here: The report doesn’t start compiling until the meeting is over. To get it as soon as possible, don’t just leave the meeting, end the meeting for everyone so everyone leaves at the same time. Sometimes people forget to hang up and that can delay when your report actually gets created.

Get the report during the meeting
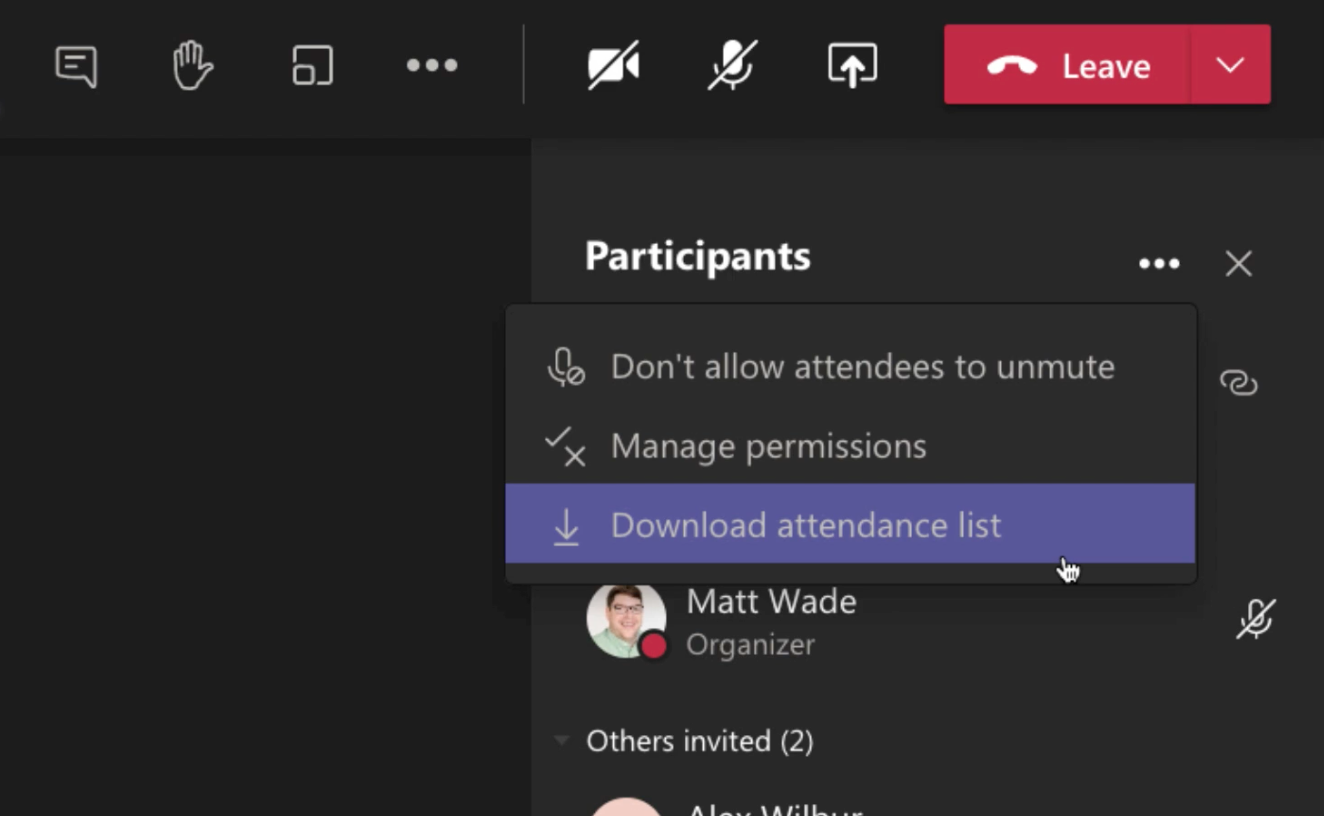
And in the case where you want to grab the attendance report during the meeting, you’ll want to open the participants pane, click the ellipses to the right of Participants, then click download attendance list. Again, the file will be downloaded to your computer’s default downloads folder.
Be wary of downloading the attendance report during the meeting now that you can get it after the meeting automatically. An attendance report grabbed during the meeting is only a snapshot in time. Things can change after you download it. I would just wait for the file to show up in the meeting chat afterwards unless you need the report immediately.
And a small aside: in both cases—after and during the meeting—where to get the meeting attendance is not an obvious option because for whatever reason, Microsoft chose to use an icon that generally means download—which, yes, you’re downloading a file—but the icon should probably represent the context of a checklist or group of people. So don’t be surprised if you missed either of these options in the past because the icon did not scream "attendance list!" to you. Oh well.
What you can do with the file
Now, what does Teams actually give you? The downloaded file is a CSV file—or comma separated value file—which is an old-school, simple, and cross-platform spreadsheet file. It’s actually unfortunate in my opinion that the attendance report isn’t offered as an Excel file as an option. The precedent is there for meeting transcripts, which come in the standard transcript filetype, but also Word doc. That really should be a thing, because most people outside of geekdom don’t know what CSV files are nor what to do with them.
The easiest way to work with this file is to open Excel then open the file from wherever you saved it. Once the new attendance report type is enabled—the updated version I mentioned earlier—you get more information in the report. That includes the meeting name, start time, number of attendees, participant name, join time, leave time, email if there is one, and role in the meeting.

If you see somebody listed multiple times, it means they joined, left, and re-joined. Unlike the older version of the attendance report, if somebody joins the meeting early, it will record what time they actually joined, not what time the organizer joined.
And from there you can work with the information however you’d like.
Wrap up
So that’s how you can manage taking attendance automatically in your online meeting or class. The big takeaway here is there’s a new, better way to do it, and you need to pester your Office 365 admin to enable it.
Thanks so much for reading. I hope you found this useful. Please leave any questions or comments below. I’m curious to hear how you’re working with attendance reports—especially on how you slice and dice the data in Excel! That’s really where the value is. Happy tracking attendance and I hope it entices your colleagues and students to be more punctual and present.


Obviously you have an opinion, so share it!